
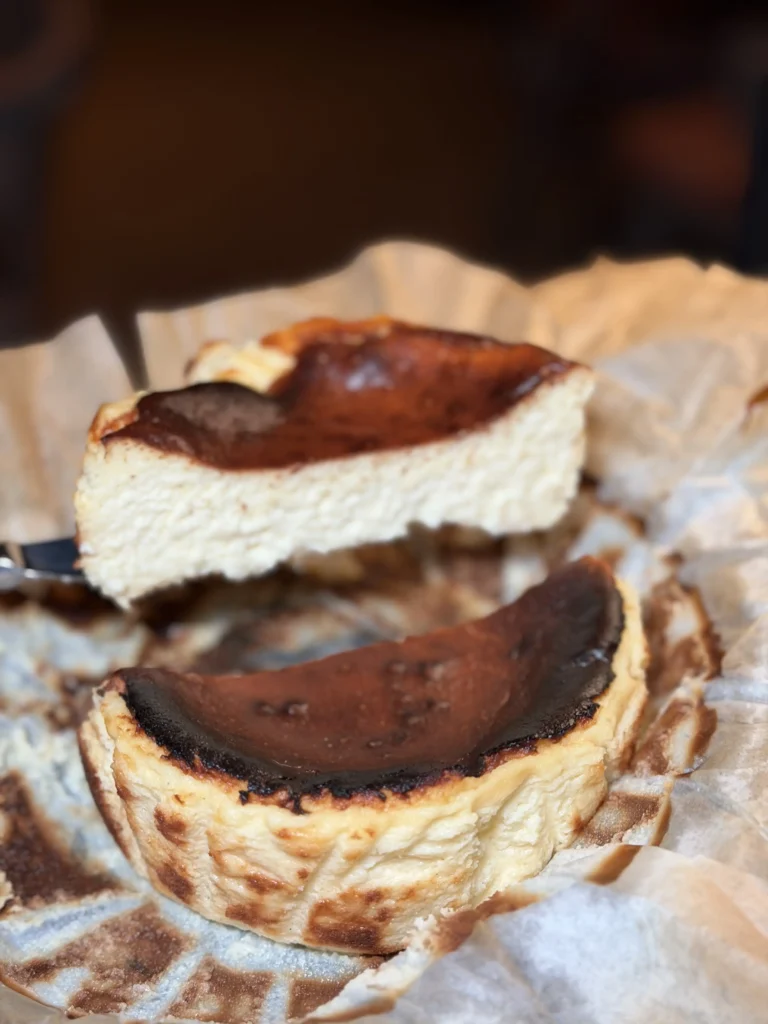
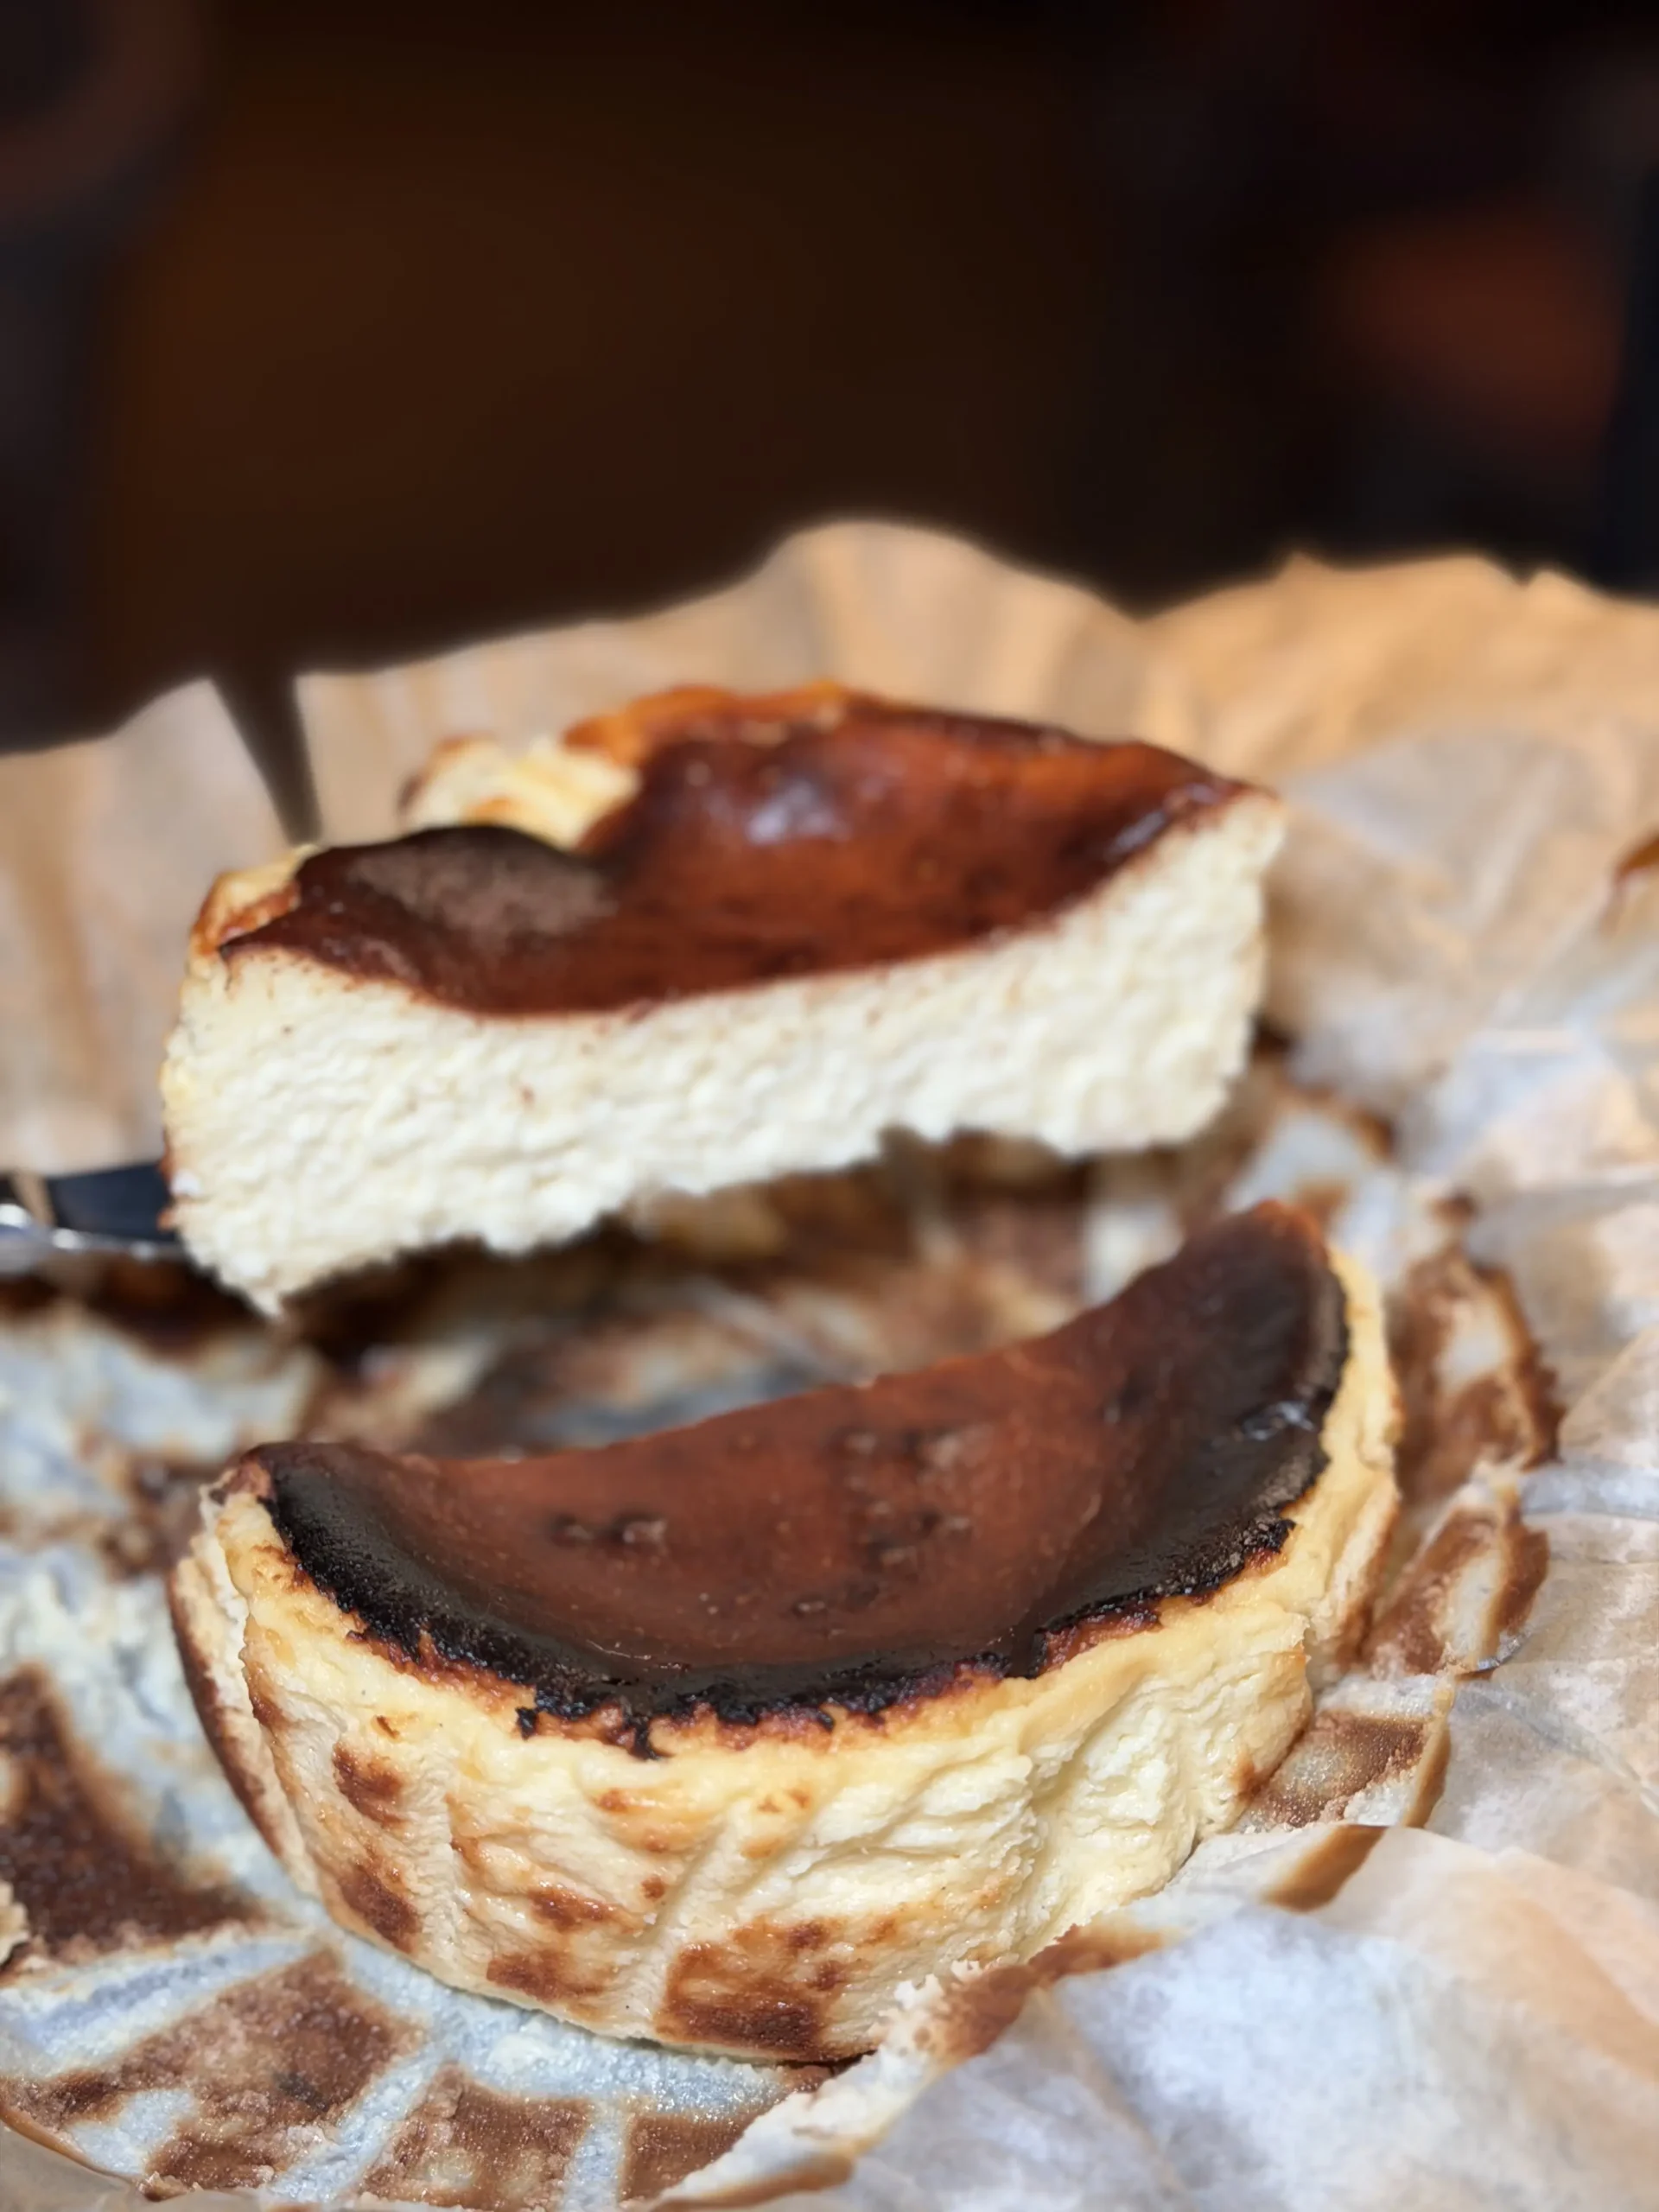
Basque cheesecake is the easiest, most forgiving dessert you will ever make. No crust, no water bath, no stress about cracks. You mix six ingredients, pour the batter into a parchment-lined pan, and bake at high heat until the top turns deep mahogany brown and the center still jiggles like custard. The result is a creamy, almost mousse-like interior with a caramelized surface that tastes like the best parts of creme brulee. This post covers two methods: a full-size 8-inch oven version and a small-batch air fryer version in a 6-inch pan for when you want the same texture in half the time.
Jump to RecipeWhy Basque Cheesecake Works Without a Crust or Water Bath
High Heat Does the Heavy Lifting
Traditional cheesecakes bake low and slow in a water bath to prevent cracking and drying out. Basque cheesecake takes the opposite approach. You bake at 425°F (220°C) so the exterior caramelizes quickly while the interior stays protected by the high moisture content of the batter. The heavy cream and eggs create enough steam inside the cake to keep the center custardy and soft. Therefore, the water bath becomes unnecessary because the batter itself provides all the moisture insulation the cake needs.
The Parchment Paper Is Not Optional
Crumpled parchment paper serves two purposes beyond easy release. First, the wrinkles create air pockets between the paper and the pan walls. Those air pockets act as insulation, slowing heat transfer to the sides so the edges do not overcook before the center sets. Second, the rustic creased texture on the finished cake is part of the visual identity. Flat-lined parchment produces a thicker band of overcooked cheesecake around the edges. Additionally, the paper should extend at least 2 inches above the rim of the pan because the cheesecake puffs dramatically during baking before collapsing as it cools.
No Crust Means Fewer Variables
Without a graham cracker or cookie base, you eliminate an entire category of potential problems: soggy bottoms, crust separation, uneven pre-baking. The bare parchment allows the bottom of the cheesecake to cook evenly with the rest of the batter. Consequently, the whole cake has a uniform custardy texture from edge to center, with the only variation being the intentional caramelization on top.
The Best Ingredients for Basque Cheesecake
Cream Cheese: Full-Fat Block Only
Philadelphia or any full-fat block cream cheese is the standard. Do not use low-fat, Neufchatel, whipped, or tub-style cream cheese. Low-fat versions contain stabilizers and extra water that prevent the cheesecake from setting properly. The fat content in full-fat cream cheese is what gives basque cheesecake its rich, dense, yet somehow airy texture. Room temperature cream cheese is critical. Cold cream cheese creates lumps that no amount of mixing will smooth out, and those lumps become visible pockets of unblended cheese in the finished cake.
Eggs: The Structure of the Entire Cake
Five large eggs for the full-size version, two for the air fryer batch. Eggs provide all the structure in a crustless cheesecake. Too few eggs and the center stays completely liquid. Too many and the texture becomes dense and eggy rather than custardy. Bring eggs to room temperature before mixing. Cold eggs cause the cream cheese to seize up into small lumps. A quick trick: place whole eggs in a bowl of warm (not hot) water for 10 minutes before starting.
Heavy Cream: Why You Cannot Substitute Milk
Two cups of heavy cream for the oven version, 3/4 cup for the air fryer. Heavy cream’s fat content (36% or higher) creates the silky, almost sauce-like consistency of the baked interior. Milk or half-and-half does not contain enough fat to achieve this texture. Furthermore, the high moisture from heavy cream allows the cheesecake to withstand the extreme oven temperature without drying out. The cream is what separates a basque cheesecake from a standard New York cheesecake.
Flour: Optional but Helpful
One-quarter cup of all-purpose flour for the large version, one tablespoon for the small. Flour is technically optional. However, it absorbs excess moisture and gives the cake slightly more structure, which makes it easier to slice cleanly the next day. For a gluten-free version, substitute cornstarch in equal amounts. Some bakers omit flour entirely for an even more custardy, almost pudding-like center. If you prefer that texture, leave it out.
Oven vs. Air Fryer: Which Method to Choose
When to Use the Oven (Full-Size, 8-Inch Pan)
The oven version yields a large cake that serves 8 to 10 people. It requires a standard springform pan and a conventional oven preheated to 425°F (220°C). Baking time runs 50 to 60 minutes. This is the version to make for dinner parties, holidays, or any occasion where you want a dramatic centerpiece dessert. The larger volume of batter produces the most dramatic puff and collapse, which gives the cake its signature sunken center and tall rustic edges.
When to Use the Air Fryer (Small Batch, 6-Inch Pan)
The air fryer version is designed for 2 to 4 people. It uses roughly one-third of the ingredients and fits in a 6-inch cake pan that slides directly into most air fryer baskets. Total cook time is 25 to 30 minutes compared to 50 to 60 in a conventional oven. The air fryer circulates hot air around the pan, which browns the top quickly and efficiently. As a result, you get the same caramelized surface with a shorter bake time. The trade-off is a smaller cake with slightly less dramatic height, but the texture and flavor are identical.
Temperature Differences Between Methods
The oven version bakes at a steady 425°F (220°C) for the full duration. The air fryer version uses a two-stage approach: 320°F (160°C) for 20 to 25 minutes to cook the interior gently, then 400°F (205°C) for 3 to 5 minutes to char the top. Air fryers run hotter than their displayed temperatures because the heating element sits close to the food. Specifically, if your air fryer tends to burn things, drop the initial temperature by 10 to 15 degrees and extend the time slightly.
How to Tell When Basque Cheesecake Is Done
The Jiggle Test
This is the most reliable indicator. When you gently shake the pan, the center of the cheesecake should jiggle like set Jell-O, not liquid. The outer 2 inches should hold firm while the middle 3 to 4 inches wobble. If the entire surface moves as one solid piece, the cake is overbaked. If the center sloshes like liquid batter, it needs more time.
The Color Guide
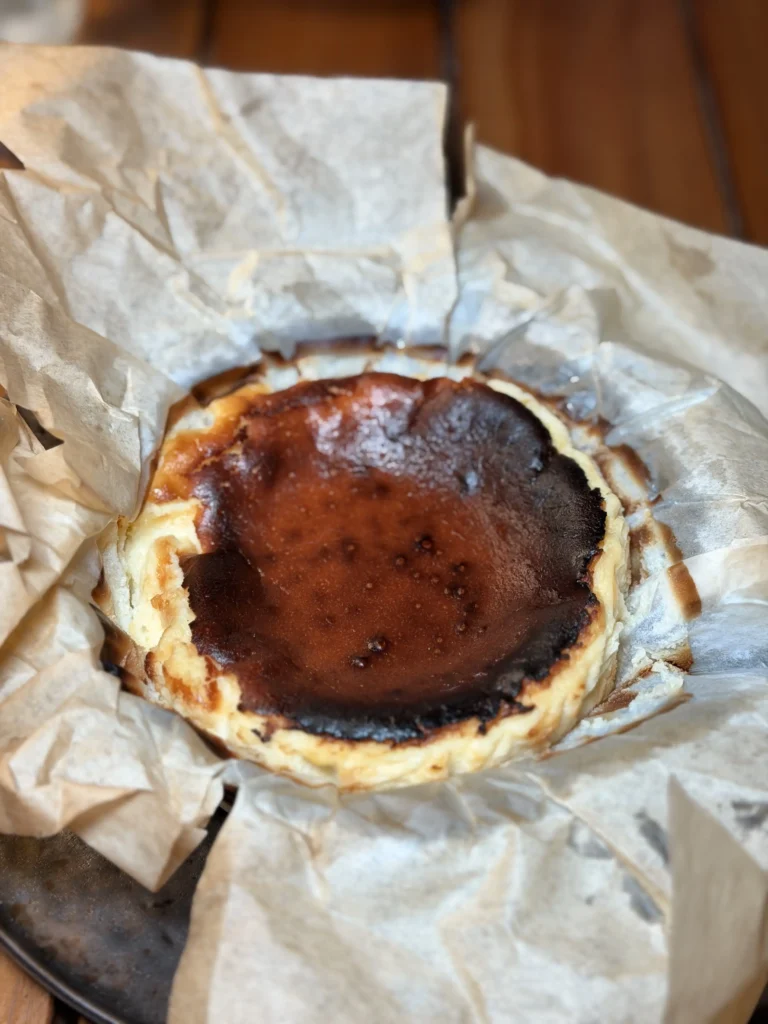
The top should reach a deep mahogany brown. Light golden does not cut it. The caramelization on top is not just cosmetic. It provides a thin, slightly bitter crust that balances the sweet, creamy interior. That contrast between the bitter-sweet top and the rich custard below is what makes basque cheesecake different from every other cheesecake. Consequently, do not pull the cake early because it looks dark. Dark is the goal.
Texture Control: Gooey vs. Firm
For an ultra-gooey, custard-like center, pull at 50 minutes (oven) or 20 minutes (air fryer). For a firmer texture closer to traditional New York cheesecake, bake to 60 to 65 minutes (oven) or 25 minutes (air fryer), then chill overnight. The cheesecake continues to set as it cools and firms up significantly in the refrigerator. Therefore, always err on the side of underbaking. You can chill it longer, but you cannot undo overbaking.
Common Mistakes and How to Fix Them
The Batter Has Lumps
Cold cream cheese is the cause 90% of the time. If you already have lumps, strain the batter through a fine-mesh sieve before pouring it into the pan. This adds one step but guarantees a smooth finished product. For future batches, let the cream cheese sit at room temperature for at least 1 hour, or microwave it in 15-second bursts until it is pliable but not melted.
The Top Is Not Dark Enough
If the cheesecake is set but the top is still light, switch to the broiler for 1 to 2 minutes. Watch it constantly. The surface can go from golden to black in under 30 seconds under a broiler. In the air fryer, bump the temperature to 400°F (205°C) for the final 3 to 5 minutes. The high blast of heat at the end mimics the intense top-down heat of a professional oven.
The Center Sank Too Much
Every basque cheesecake deflates. That is by design. The eggs cause the batter to soufflé during baking, and as the steam escapes during cooling, the center collapses. If the sinking is extreme (more than 2 inches below the rim), the oven temperature may have been too high, causing excessive puffing followed by a dramatic collapse. On the other hand, a gentle, even deflation of about 1 inch is exactly what you want.
It Cracked on Top
Cracks are acceptable and even expected in basque cheesecake. Unlike traditional cheesecake, where a crack indicates failure, basque cheesecake embraces the rustic, imperfect aesthetic. However, if deep cracks bother you, reduce the oven temperature by 10 degrees and extend baking time by 5 minutes. This allows the surface to set more gradually.
Basque Cheesecake
Ingredients
Cold cream cheese and eggs create lumps that will not smooth out. Set everything on the counter 1 hour before you start. For a quick fix, place eggs in warm water for 10 minutes and microwave cream cheese in 15-second bursts.
The top is supposed to look dark. Deep mahogany brown, almost scorched. That caramelized surface provides a slightly bitter contrast to the sweet, creamy interior. Do not pull it early because it looks too dark.
Want it gooey and custardy? Pull at 50 minutes (oven) or 20 minutes (air fryer). Want it firmer like a New York cheesecake? Go to 60-65 minutes (oven) or 25 minutes (air fryer) and chill overnight.
Step-by-Step Instructions
Step 1: Prep the Pan
Preheat your oven to 425°F (220°C). For the air fryer version, preheat to 350°F (175°C) for 3 to 5 minutes.
Take a large sheet of parchment paper and crumple it into a tight ball, then unfold it. The wrinkles make it flexible enough to press into the corners of the pan without tearing. Line your springform pan (8-inch for oven, 6-inch for air fryer) and let the parchment extend at least 2 inches above the rim. The cheesecake will rise above the pan during baking, so that extra height is important.
Step 2: Mix the Batter
Beat the room-temperature cream cheese with sugar until completely smooth. No lumps. This takes about 2 minutes with a hand mixer or stand mixer on medium speed. Scrape down the sides of the bowl at least once.
Add eggs one at a time, mixing on low speed until each egg is fully incorporated before adding the next. Do not overwhip. You want a smooth batter, not a fluffy one. Incorporating too much air causes excessive puffing and cracking.
Pour in the heavy cream, vanilla extract, and salt. Stir until the batter is silky and uniform. It will be thinner than traditional cheesecake batter, closer to the consistency of heavy pancake batter. That is correct.
If using flour, sift it into the batter and mix just until combined. Over-mixing the flour activates gluten, which toughens the texture.
Step 3: Bake (Oven Method)
Pour the batter into the prepared pan. Tap the pan gently on the counter 2 to 3 times to release any large air bubbles.
Place the pan in the center of the oven and bake for 50 to 60 minutes. Do not open the oven door during the first 40 minutes. The cheesecake needs consistent heat to puff evenly. At 50 minutes, check the jiggle. The center should wobble like set custard, not liquid.
For a gooey center, pull at 50 minutes. For a firmer set, go to 60 minutes.
Step 4: Bake (Air Fryer Method)
Pour the batter into the 6-inch pan. Place the pan in the preheated air fryer basket.
Air fry at 320°F (160°C) for 20 to 25 minutes. The lower initial temperature cooks the interior gently without burning the top. Then increase to 400°F (205°C) for 3 to 5 minutes to achieve the signature dark caramelized top. If the top browns too quickly, cover loosely with a small piece of foil for the first 15 minutes.
Check doneness the same way: the top should be deep brown and the center should jiggle.
Step 5: Cool and Chill
Let the cheesecake cool at room temperature in the pan. It will deflate as it cools. That is normal and expected.
Once cooled to room temperature, refrigerate for at least 4 hours. Overnight is better. The chilling period allows the custard center to set and the flavors to develop. Serve slightly chilled or at room temperature for the creamiest texture.
Basque Cheesecake (Oven + Air Fryer)
Ingredients
Equipment
Method
- Preheat oven to 425°F (220°C). For air fryer, preheat to 350°F (175°C) for 3-5 minutes. Line your pan (8-inch springform for oven, 6-inch for air fryer) with crumpled parchment paper, letting it extend at least 2 inches above the rim.
- Beat room-temperature cream cheese with sugar until completely smooth, about 2 minutes on medium speed. Scrape down the sides of the bowl at least once.
- Add eggs one at a time, mixing on low speed until each is fully incorporated before adding the next. Do not overwhip.
- Pour in heavy cream, vanilla extract, and salt. Stir until the batter is silky and uniform. It will be thinner than traditional cheesecake batter.
- If using flour, sift it into the batter and mix just until combined. Do not overmix.
- Pour batter into the prepared pan. Tap gently on the counter 2-3 times to release air bubbles.
- OVEN: Bake 50-60 minutes. The top should be deep mahogany brown and the center should jiggle like set custard when gently shaken. AIR FRYER: Cook at 320°F (160°C) for 20-25 minutes, then increase to 400°F (205°C) for 3-5 minutes to caramelize the top.
- Cool at room temperature in the pan (it will deflate, that is normal). Refrigerate for at least 4 hours, or overnight for the cleanest slices. Serve slightly chilled or at room temperature.
Notes
Basque Cheesecake — FAQ
Basque Cheesecake Questions
Basque cheesecake has no crust, bakes at a much higher temperature (425°F vs. 325°F), and does not use a water bath. The result is a caramelized, almost burnt exterior with a custardy, creamy interior. Traditional cheesecake is dense, firm, and smooth throughout. Basque cheesecake is lighter, airier, and intentionally rustic.
The dark caramelized top is not actually burnt. It is deeply caramelized sugar from the high baking temperature, similar to the topping on creme brulee. That thin, slightly bitter crust provides a flavor contrast to the sweet, creamy interior. This contrast is the defining characteristic of the dessert.
Yes. The air fryer is excellent for basque cheesecake because it circulates hot air that browns the top quickly. Use a 6-inch pan with a small-batch recipe. Start at 320°F for 20 to 25 minutes, then increase to 400°F for 3 to 5 minutes to caramelize the top. Total cook time is roughly half that of the oven method.
The top should be deep mahogany brown. When you gently shake the pan, the center should jiggle like set Jell-O, not slosh like liquid. The outer edges should hold firm. The cheesecake continues to set as it cools and chills, so always err on the side of underbaking.
Technique and Storage
That is completely normal. The eggs cause the batter to puff up like a souffle during baking. As it cools, the steam escapes and the center collapses. A gentle 1-inch deflation is exactly what you want. The sunken center is part of the dessert’s signature rustic appearance.
Yes. Substitute cornstarch for the all-purpose flour in equal amounts, or omit the flour entirely. Without flour, the center will be slightly more custardy and gooey, which many people prefer. The flour is optional in this recipe and primarily helps the cake hold its shape when sliced the next day.
Store in an airtight container in the refrigerator for up to 5 days. The texture firms up over time, so day 2 and day 3 are often when the cheesecake tastes best. You can also freeze it whole or in slices for up to 3 months. Wrap tightly in plastic wrap and foil before freezing.
Both work, but the experience is different. Slightly chilled (30 minutes out of the fridge) gives you the creamiest center with clean slices. Room temperature makes the interior softer and more mousse-like, which is how it is traditionally served at La Viña in San Sebastian. Cold straight from the fridge produces the firmest texture.